You need to send 200 personalized offer letters, each addressed to a different candidate with a unique salary, start date, and job title. Opening each document one by one and typing in the details is out of the question. Mail merge in Google Docs is the answer — and once you know the tips that make it work smoothly, it becomes one of the most powerful tools in your Google Workspace toolkit.
This guide covers everything you need to know: whether Google Docs can do mail merge natively, how to set up the basic workflow, and nine practical tips to make your document merges faster, cleaner, and more professional.
Can You Do Mail Merge in Google Docs?
The short answer: yes, but not natively out of the box.
Google Docs does not include a built-in mail merge feature the way Microsoft Word does with its Mailings tab. However, you can do a full mail merge in Google Docs using Google Apps Script, free add-ons from the Google Workspace Marketplace, or a combination of Google Sheets and Google Docs templates.
The most popular free approach uses an add-on called Autocrat or Document Studio. Both tools connect a Google Sheets data source to a Google Docs template, fill in placeholders automatically, and generate individual documents — or merge them all into a single PDF or folder.
If your goal is to create physical documents (letters, certificates, contracts, invoices), Google Docs mail merge is exactly what you need. If your goal is to send personalized emails, a dedicated Gmail mail merge tool like Mail Merge for Gmail is a better fit — more on that below.
How to Mail Merge in Google Docs: Basic Setup
Setting up a Google Docs mail merge takes about 10 minutes the first time. Here’s the core workflow.
Step 1: Set Up Your Google Sheets Data Source
Your Google Sheets spreadsheet is the data source. Each row represents one recipient, and each column is a field you want to insert into the document.
Rules for a clean data sheet:
- Row 1 must be headers — these become your placeholder names
- No merged cells — add-ons can’t read them reliably
- No blank rows between data rows — they create empty output documents
- One sheet per merge — keep the data for each document type on a separate tab
Step 2: Design Your Google Docs Template
Create a new Google Doc and write your document. Wherever you want dynamic data inserted, add a placeholder using the column header name wrapped in double curly braces: {{First Name}}, {{Job Title}}, {{Salary}}.
The placeholder names must match your column headers exactly — including capitalization and spaces.
Dear {{First Name}} {{Last Name}},
We are pleased to offer you the position of {{Job Title}} with a start date of {{Start Date}}.
Your annual compensation will be {{Salary}}.
Step 3: Run the Merge and Export
Install Autocrat or Document Studio from the Google Workspace Marketplace (both have free tiers). Open the add-on from your Google Sheet, connect it to your Google Docs template, map the columns to placeholders, and run the merge.
The add-on generates one output document per row and saves them to a Google Drive folder. You can export the outputs as individual PDFs, a merged PDF, or leave them as Google Docs.
9 Tips for Better Mail Merge in Google Docs
The basic setup is straightforward, but these tips will save you time and prevent the most common mistakes.
Tip 1: Match Placeholder Names Exactly to Column Headers
This is the number one source of broken merges. If your column is First Name (capital F, space), your placeholder must be {{First Name}} — not {{first name}}, {{firstname}}, or {{FirstName}}. Copy and paste the header directly into the template to avoid typos.
Tip 2: Clean Your Data in Google Sheets Before Merging
Don’t trust raw data. Use Sheets formulas to normalize it before running the merge:
=TRIM(A2)— removes leading/trailing spaces from names=PROPER(B2)— capitalizes first letter of each word (e.g., “MARIA SANTOS” → “Maria Santos”)=TEXT(C2, "MMMM D, YYYY")— formats dates consistently (e.g., “May 15, 2026”)=DOLLAR(D2, 0)— formats numbers as currency (e.g., “110000” → “$110,000”)
Create a separate “Clean Data” sheet with these formulas, and use that sheet as the merge source.
Tip 3: Generate a Test Document Before Running the Full Batch
Always run the merge on a single test row first. Add a filter column (e.g., Send? with YES/NO) and configure the add-on to only process rows marked YES. Merge just one row, check the output, fix any template issues, then run the full batch.
This takes 30 seconds and can save you from regenerating 500 documents with a formatting error.
Tip 4: Use a Consistent Naming Convention for Output Files
Autocrat and Document Studio let you define the output file name using the same {{placeholders}} syntax. A good naming pattern makes the files easy to find later:
Offer Letter — {{Last Name}}, {{First Name}} — {{Start Date}}This produces: Offer Letter — Santos, Maria — June 1, 2026.pdf
Avoid using special characters like /, :, or ? in file names — they break Google Drive’s naming on some systems.
Tip 5: Export to PDF for Final Documents
For professional documents like contracts, certificates, or invoices, always export the output as PDF rather than leaving it as a Google Doc. PDFs preserve your formatting exactly, prevent edits by recipients, and work reliably across all devices.
Document Studio handles this natively. In Autocrat, select “PDF” as the output format in the merge settings.
Tip 6: Separate Your Data and Template into Different Drive Folders
Keep your Google Sheets data files in one Drive folder and your Google Docs templates in another. This prevents accidental edits to the template during a merge run and makes it easier to reuse the same template for future batches.
Share the template folder with your team using “Viewer” access — they can use it but can’t modify it.
Tip 7: Use the Timestamp Column to Track Merge Runs
Add a Merged At column to your spreadsheet and configure your add-on to write the current timestamp when a row is processed. This creates an audit trail and lets you skip already-processed rows in future runs by filtering on the timestamp column.
Tip 8: Combine Google Docs Merge with a Follow-Up Email
For use cases like offer letters or invoices, you often need to both generate the document and send an email with it attached. Document Studio can email the generated PDF directly from your Gmail account — or you can use Mail Merge for Gmail to handle the email step separately with full personalization and open tracking.
The typical workflow: generate PDFs with Document Studio → upload to Drive → attach and send with Mail Merge for Gmail.
Tip 9: For Emails, Use a Dedicated Mail Merge Tool Instead
Google Docs mail merge is powerful for creating documents, but if your end goal is sending personalized emails, you’ll get better results — and much less friction — with a dedicated Gmail mail merge tool.
Tools built for email merge handle attachments, delivery scheduling, bounce tracking, and open notifications that Google Docs add-ons simply don’t offer.
Send personalized bulk emails directly from Gmail using your Google Sheets data — with open tracking, attachment support, and scheduling built in.
Get Started →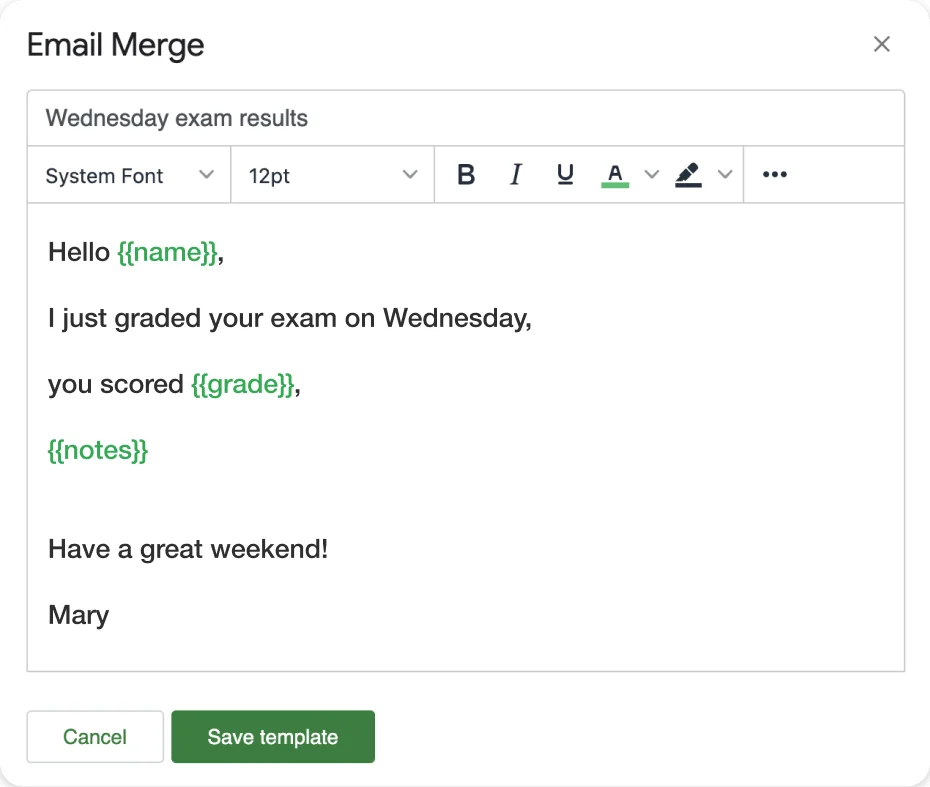
Best Use Cases for Google Docs Mail Merge
Google Docs mail merge works best when the output is a formatted document, not an email. The most common use cases:
HR and recruiting
- Offer letters with personalized compensation details
- Employment contracts with individual start dates and roles
- Performance review templates pre-filled with employee data
Education and training
- Completion certificates with participant names and course dates
- Personalized report cards or progress summaries
- Welcome letters for new students or program participants
Finance and operations
- Invoices with client-specific line items and payment terms
- Purchase orders with vendor details and part numbers
- Expense reports pre-populated with employee data
Sales and client management
- Proposal covers with prospect names and deal details
- Personalized pitch decks with company-specific data
- Non-disclosure agreements with pre-filled party information
For any of these that also require an email delivery step, pair your Google Docs merge with Mail Merge for Gmail to send the completed PDFs as attachments.
Google Docs Mail Merge vs Gmail Mail Merge
Both tools use Google Sheets as a data source, but they serve different purposes:
| Google Docs Mail Merge | Gmail Mail Merge | |
|---|---|---|
| Output | Documents (PDF, Docs) | Emails |
| Best for | Contracts, letters, certificates | Newsletters, follow-ups, offers |
| Tools needed | Autocrat or Document Studio | Mail Merge for Gmail |
| Open tracking | No | Yes |
| Scheduling | Basic (run now) | Yes (schedule for later) |
| Attachments | Document is the output | Attach files to emails |
If you’re choosing between the two, ask: “Do I need a document, or do I need to reach someone’s inbox?” Document → Google Docs merge. Inbox → Gmail merge.
For more on email-based merging, see our full guide to mail merge in Gmail or how to send personalized bulk emails from Google Sheets.
Frequently Asked Questions
Conclusion
Mail merge in Google Docs fills a real gap in Google Workspace — the ability to create hundreds of personalized documents without touching each one manually. The key is a clean Google Sheets data source, a well-structured template with accurate placeholders, and the right add-on to connect them.
The nine tips above — from cleaning data with Sheets formulas to exporting PDFs and setting smart file naming conventions — will save you significant time and help you avoid the mistakes that trip up first-time users.
When your workflow also involves sending those documents by email, pair the Google Docs merge with Mail Merge for Gmail to handle the delivery step with full personalization, tracking, and scheduling. Together, they cover the complete document-and-email workflow in Google Workspace without leaving the tools you already use.