Google Forms is a fast, free way to collect orders without buying dedicated e-commerce software. A properly built Google Forms order form template captures product selection, quantities, contact details, and delivery preferences in one tidy link you can share anywhere.
This guide walks you through every step — from setting up your first question to handling quantity tracking, conditional logic, and timed ordering windows for flash sales.
What Can You Use a Google Forms Order Form For?
Google Forms works for any scenario where you need structured order intake without a full online store:
- Small business orders: custom cakes, T-shirts, handmade goods, local produce boxes
- School or club merchandise: team jerseys, yearbooks, event tickets
- Internal company requests: office supply requests, catering orders, equipment loans
- Flash sales and pre-orders: limited-run products with a closing deadline
- Service bookings: photography sessions, catering packages, consultation slots
The free tier handles unlimited responses, automatic email notifications, and real-time results in Google Sheets — which is more than enough for most small operations.
Step-by-Step: How to Create an Order Form in Google Forms
Step 1: Open a Blank Form
Go to forms.google.com and click the large + to open a blank form. Give it a clear title — “Product Order Form,” “Bakery Order Form,” or whatever fits your business.
Click the palette icon in the top-right corner to pick a header color and upload a logo. A branded header increases completion rates because it looks professional.
Step 2: Add Contact Fields
Every order form needs to identify the buyer. Add these questions using the Short answer question type:
- Full name (required)
- Email address (required)
- Phone number (optional for most use cases)
- Delivery address (if you are shipping)
Mark name and email as required by toggling the switch at the bottom of each question card.
Step 3: Build Your Product Section
This is the heart of your Google Forms order form template. How you structure it depends on how many products you offer.
Option A — Dropdown list (2-10 products)
Use a Dropdown question: “Which product would you like to order?” and list each item as an option. Clean and fast for small catalogs.
Option B — Checkboxes (multiple products at once)
Use a Checkboxes question: “Select everything you want to order.” Customers can tick multiple items in a single question. Good for bakery order forms where someone might want a mix of pastries.
Option C — Grid for size and color variants
Use a Multiple choice grid when products come in variants. Rows are product names, columns are sizes or colors. Each row gets one selection.
Step 4: Capture Quantity
Google Forms does not have a native number-spinner, but you can collect quantities cleanly with two approaches:
Short answer with input validation
Add a Short answer question: “How many would you like?” Click the three-dot menu, choose Response validation, set it to Number, and add a minimum of 1. This blocks text entries and prevents zero-quantity submissions.
Dropdown for fixed quantities
If you only allow orders of 1, 2, 5, or 10 units, use a Dropdown with those options listed. It eliminates typos and keeps fulfillment simpler.
For a bakery order form on Google Forms, a typical setup is one Checkboxes question for product selection and one Short answer quantity field for each selected item, using conditional logic to show relevant follow-up questions.
Step 5: Add Conditional Logic (Show/Hide Fields)
Go to the three-dot menu on a question and choose Go to section based on answer. This lets you show shipping fields only when someone selects “Delivery” instead of “Pickup,” or ask for custom text only when someone orders a personalised item.
To set this up:
- Create separate form sections for each path (Pickup, Delivery).
- On your “Fulfillment method” question, map each answer to the correct section.
- Add a final section at the end that all paths merge into (the confirmation / payment note section).
This prevents customers from seeing irrelevant questions and keeps the form short, which improves completion rates across every Google Forms use case.
Step 6: Payment Instructions and Order Notes
Google Forms does not process payments natively. The cleanest approach is a short Description block (inserted via the text block element) that explains how to pay: bank transfer reference, PayPal handle, Venmo tag, or “pay on pickup.”
Add a final Short answer question: “Anything else we should know about your order?” This catches custom requests without cluttering the main flow.
Step 7: Set Up Email Notifications
Click the three-dot menu next to the Send button and choose Get email notifications for new responses. You will receive an email for every submission.
For more control, open Responses and click the Sheets icon to link to a Google Spreadsheet. Every new order lands as a row, making it easy to track fulfillment status by adding a “Status” column (Received, In Progress, Shipped, Done).
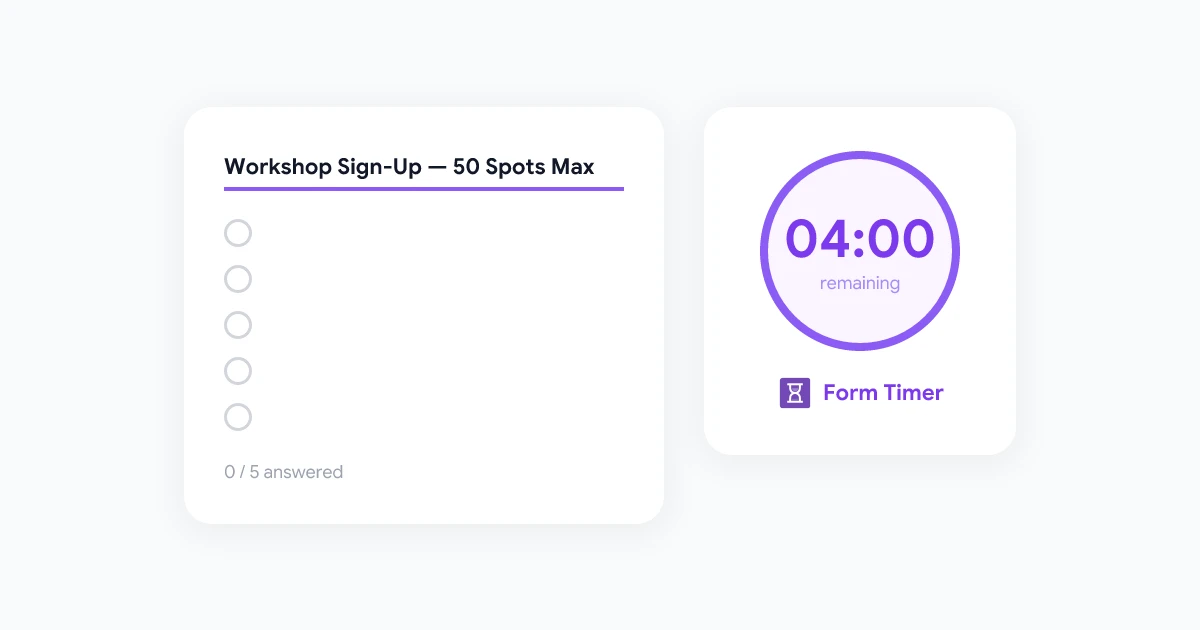
Add a live countdown timer and auto-close deadline to any Google Form. Perfect for flash sales, limited-stock orders, and pre-order windows that need a hard cutoff.
Get Started →
Google Forms Order Form Templates: Ready-Made Structures
Basic Product Order Form Template
Section 1: Your Details
- Full name (Short answer, required)
- Email address (Short answer, required)
- Phone (Short answer, optional)

Section 2: Your Order
- Product (Dropdown)
- Quantity (Short answer, Number validation, min 1)
- Special requests (Paragraph, optional)

Section 3: Fulfillment
- Pickup or delivery? (Multiple choice)
  → Pickup: go to Section 4
  → Delivery: go to Section 5

Section 4: Pickup Details
- Preferred pickup date (Date question)

Section 5: Delivery Details
- Street address (Short answer)
- City and postcode (Short answer)

Section 6: Payment Note (Description block)
"Please transfer payment to [PayPal / bank details] using your name as reference."
Shirt Order Form Template for Google Forms
For T-shirt or apparel orders, the grid question type is most useful. Use rows for shirt sizes (S, M, L, XL, 2XL) and columns for quantities (1, 2, 3, 4, 5+). Add a separate question for colour choice via Dropdown.
If you are running a school or club fundraiser, add a “Homeroom / Team” Short answer field so you can batch fulfillments by group.
Bakery Order Form Template for Google Forms
Bakery forms work best with Checkboxes for product selection (croissants, sourdough loaves, muffin packs, custom cakes), followed by a Short answer quantity field for each selected item via conditional logic, and a Date question for the requested collection date.
Include a note about minimum order lead times in the form description so customers understand your workflow upfront.
Adding a Deadline to Your Order Form
Standard Google Forms stay open indefinitely. For pre-orders, flash sales, or seasonal menus with a closing date, you need a way to automatically shut the form at a specific time.
The simplest method is using Form Timer to add a countdown and auto-close deadline to your order form. You set the closing date and time once; the form shows a live countdown to every visitor and stops accepting responses the moment the deadline passes, even if you are asleep.
This works well for:
- Flash sales: “Order by Sunday 11:59 PM” with a visible timer that creates urgency
- Weekly pre-orders: auto-close every Friday at noon, reopen Monday morning
- Limited stock runs: close after a certain number of orders (combine with a response limit)
A countdown timer on your order form converts browsers into buyers. When customers can see a deadline ticking down, they act instead of waiting. Form Timer adds this to any Google Form in under two minutes.
Common Mistakes to Avoid
Not validating quantity fields. Without number validation, customers type “two” or leave the field blank. Always add response validation to quantity questions.
Missing the payment instruction. It sounds obvious, but many order forms collect the what-and-when without telling buyers how to pay. A clear payment note reduces back-and-forth.
Leaving the form open forever. Pre-order and flash-sale forms that never close create fulfillment chaos. Use Form Timer or Google Forms’ built-in response limit to cap submissions.
No confirmation message. Go to Settings and update the confirmation message to something specific: “Thanks for your order! We will confirm by email within 24 hours.” The default “Your response has been recorded” feels cold and leaves customers uncertain.
Forgetting mobile. Most order form traffic comes from phones. Preview your form on mobile before sharing. Long dropdowns and grid questions can be hard to tap on small screens — break them into separate questions if needed.
How to Share Your Google Forms Order Form
Once your form is ready, click Send and choose how to distribute it:
- Link: copy the URL and paste it anywhere — email, WhatsApp group, Instagram bio, website
- Email: send directly from Google Forms to a list of addresses
- Embed: click the
< >icon to get an embed code for your website - QR code: third-party sites like qr-code-generator.com let you create a QR from the form URL for printed menus, flyers, and packaging
For repeat customers, create a Google Site page that permanently hosts the embed code. Update the linked form each week without changing the page URL.
Connecting Orders to Google Sheets for Fulfillment Tracking
The real power of an order form Google Forms setup is the automatic Sheets integration. Every submission appends a new row — date, name, email, product, quantity, notes — without any manual data entry.
From there, you can:
- Add a Status column (Received, Paid, Packed, Shipped) and update it as you fulfill orders
- Use Conditional formatting to colour-code rows by status
- Create a pivot table to see total quantities per product
- Set a notification rule in Sheets to alert you whenever a new row is added
If you want to go further, the full breakdown of Google Forms features covers how to connect form responses to automated email workflows using Google Apps Script.
FAQ
Wrapping Up
A Google Forms order form template is one of the quickest ways to start collecting structured orders without any e-commerce overhead. The setup takes about ten minutes, the Sheets integration handles your fulfillment tracking automatically, and conditional logic keeps the form short regardless of how many products you offer.
If you run time-sensitive sales — pre-orders, seasonal menus, flash sales — pair your order form with Form Timer’s auto-close countdown so the deadline enforces itself and you can focus on fulfillment instead of watching a clock.
Build the form, share the link, and let Google handle the data collection.